
While many of my paintings are finished completely from life in one or two sittings, not all of them--I am sad to say--have that luxury. There are lots of reasons for this - the sun goes down, the weather changes, the model session is up, the model is moving to a different state (this HAS happened to me more than once!), I have to scurry off on other errands, or perhaps I'm just plain tired and can't go further without the risk of making some big mistakes.
So how do you finish a painting in the studio and still make it look fresh and exciting, like it did when you were on location or in front of the model?
Artist friends, I am going to share a quick Photoshop tutorial with you, but before I do, I want to emphasize the importance of the following when working from your reference photos... these points are key to maintaining that freshness (and I credit them to my mentors in the art world)!
1) Work on your painting as though you are still in front of the actual subject. Try to remember what you were seeing and experiencing in that moment, and sometimes you can "trick" yourself into feeling as though you are still painting from life.
2) Simplify, the way you would en plein air. DO NOT copy every little detail you see in your photo - this will destroy the freshness and spontaneity of your painting.
3) Use the photos to embellish what you started with, NOT to repaint the whole thing.
4) Don't match your painting to the photo - match the photo to your painting! Remember that the colors and values on your canvas are going to be more visually accurate to the subject matter than your photos.
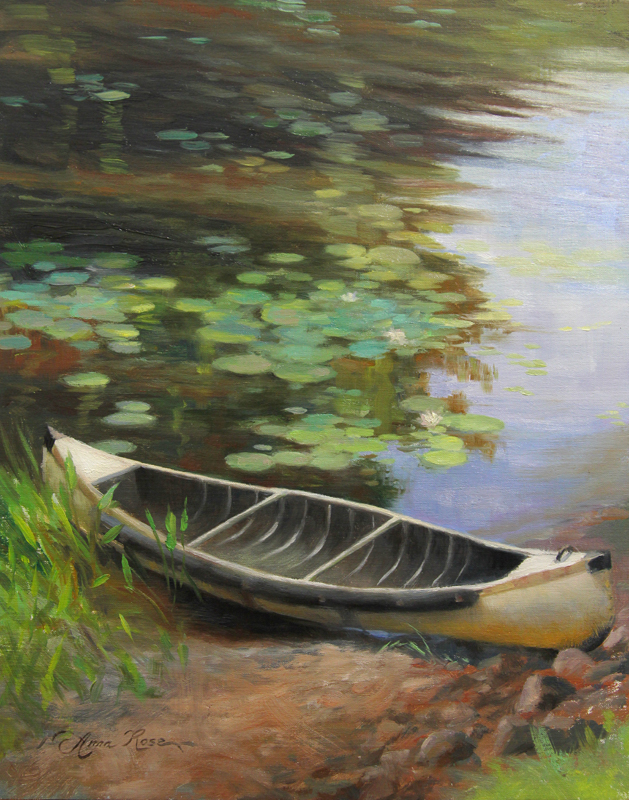
I'm showing you a couple of examples, one from my plein air painting, "Old Canoe," and one from working with a live model, "Jessie in Profile".

Above: The scene I was working from. As you can see, there are lots of tiny details in the photo. The darks look VERY dark, and the colors aren't very warm or saturated compared to my painting.

Above: This is about as far as I got, painting the canoe on location. The lighting changed dramatically, so I was forced to stop.
Below: The finished painting. It turns out, I didn't have to add too much more to it, but the photos came in handy for adding a few more lily pads and accurately laying in the ripples and reflections in the water. However, my colors and values were already nailed down from my plein air session.
Next, working from the model.

Above: My painting in progress, in the studio with my model, Jessie.
Below: This is as far as I got from the model session. After that I had to turn to the reference photos. But I pretty much had my values and color temperatures laid in.

You'll never be able to get your reference photos exact, but if you are going to work from them, it is always most helpful to get them as close in color and contrast to your original painting. I keep the painting right next to my computer monitor so I can match the photos. I also work from a color calibrated monitor - this is very important! There are countless ways to edit in Photoshop, but as I've worked with this program over the years, I've learned that simpler is always better. Below is a quick tutorial on the easiest, simplest way I can think of to edit a reference photo (this excludes compositional changes, head-swaps, or otherwise advanced editing techniques, which I will reserve for future blog posts).

Reference before editing.
Photoshop Tutorial for Artists: Editing Values, Contrast, and Color Temperature in your Reference Photos
1. Open the file in Photoshop. Create a duplicate layer of the image (keyboard shortcut: Ctrl+J) so that you can always see the image before (bottom layer) and after (edited layer). Just click the little "eyeball" on the left-hand side of your layer to reveal or hide that layer.
2. Photo references usually have WAY too much contrast. To correct this first, go to Image-->Adjustments-->Brightness/Contrast. You will usually have to slide the brightness up and the contrast down until it is as close to your painting as you can get it. The screen shot below gives you a good idea of how I lay out my work space in Photoshop (I only have the History and Layers sidebars showing). This way I can see how many layers I have going at once, as well as track every move I've made by watching the History.

3. Photos often lean too much on the warm or cool side. To correct this, go to Image-->Adjustments-->Color Balance (keyboard shortcut: Ctrl+B). There a sliders you can play around with to push something warmer or cooler. Make sure the "Preview" box is checked so you can see what you are doing. You can also try addressing saturation. For example, I felt that the reds and oranges were too far saturated in the photo, especially under that warm lighting. So I went to Image-->Adjustments-->Hue/Saturation (Ctrl+U), selected "reds", and pulled the saturation slider down. When you are satisfied with the changes, hit "OK."
4. You may still want to bring up the details in shadow areas. To do this, you will have to select specific parts of the photo. Go to the "Lasso" tool (shortcut key is "L"), and run your mouse around the area you wish to correct. The resulting area of blinking dotted lines is called a "selection." Soften the edges of your selection by feathering (Select-->Modify-->Feather or shortcut Ctrl+Alt+D). Then follow the steps above to correct that one area, or go to Levels (Ctrl+L) and use the sliders to adjust values. You can also use Curves (Ctrl+M) to adjust your lights and darks.
5. Merge your layers (Shift+Ctrl+E) and save as a new file.
Below is the corrected photo, which I also cropped in... perhaps an unnecessary step, but it saved me from visual distraction while I was working. Note: I could have selected the hair and matched that more accurately to my painting (i.e. lightened it and made it redder), but since the hair was pretty much already done on the portrait, I didn't bother.

The final painting reflects all the colors and values I saw when I started it from life, and most especially, the spirit of the pose. But thanks to the photos, I was able to finesse it a little bit more, as well as really nail down the model's likeness and most distinctive feature in profile: her beautiful nose.

Anna Rose Bain - "Jessie in Profile" - 12x9 - oil
Bonus: you can use the steps above to correct photos of your artwork, too! :-)


Great Tutorial, thanks! Since I paint mostly children I do use photos. I was also wondering if there was a setting on the camera to make my photos warmer as in the main they always turn out cool. I take mostly outdoors in natural light.
ReplyDeleteGlad it could be of some help. :-) I think the color temperature is controlled by a separate setting on your camera, called "White balance." You would find it in the menu. I have mine set to "auto" so that it detects what lighting situation I am in, but you can manually change it to whatever you want (i.e. daylight, fluorescent, etc.). I didn't even mention this in the post, but the best way to modify color temperature in your photos overall is to edit them in Adobe Bridge's Camera Raw first. I'll write about that soon! :-)
DeleteThanks, Anna! Most helpful. Definitely need to try this.
ReplyDeleteAnna thank you so much, I was looking for some info of this kind.I will try for sure.
ReplyDeleteI personally feel its more tough to draw "Nature", and you have presented it beautifully, the reflection, use of colors to perfection, simply amazing!!
Hi Sherree, So glad you found this helpful! I am only relaying information that was generously passed down to me. :-)
DeleteThank you Anna Rose. You are talented artist and great person!!Your blog helps a lot! N.P
ReplyDelete