Thursday, March 27, 2014

Angels of Death - Progression Shots (Post 2 of 2)

While "Remembrance" was painted using the colors I actually observed from my life studies with the model, "Passage" required some more preparation in order to give it the dark and moody atmosphere I wanted. After doing a color study from the model and taking some photos, I set to work on the reference photos in Photoshop, modifying my temperature scheme entirely so that everything looked a bit darker, more blue, and melancholy. My studio lights are already on the cool side, but I wanted it to look like the figure was outside at twilight. She was posed on a green rug in my studio, and I was able to maintain the color from the rug in the final painting, while modifying it to look like grass. I also used some of my own reference photos from northern skies at sunset to create the background. My vision for the piece was that the winged figure should be solitary and mournful, yet elegant, with wings stretched heavenward in anticipation of tomorrow.

1. I began "Passage" with a loose vine charcoal drawing on a white linen canvas prepared myself (see this blog post for more on making your own linen canvases). I used a thin tone of alizarin crimson and viridian. Again, I anticipated that some of the wash would show through in the final piece. I then set to work immediately on the face, hair and arm. As a portrait artist at heart, I can't usually work on the rest of the painting until I am satisfied that the face will turn out! This is as far as I got on day 1. As you can see, I've already established my lightest light (her shoulder) and darkest dark (under her elbow/behind her back).


2. I then worked on the hand and skull, trying to compare values and colors as accurately as possible to what was already established (face, hair, etc.). This is extremely important when coming back to work the next day, otherwise, it could end up looking like several different paintings in one rather than a solid, cohesive piece. I also tried to make sure my edges were interesting, working the background around the forms so that it looked soft and as if it were painted all at once. I began blocking in the sky (I suppose it looks like I was having a little too much fun!).


3. It's hard to tell from the photo, but there was a LOT of paint in the lights of the wings (a mixture of pure white and lemon yellow, with touches of radiant blue and green). I used a lot of colors in this painting that are not part of my typical portrait palette; for example, the sky is Sevres blue (by Rembrandt), and the earthy green darks throughout consist of lots of olive green (Winsor & Newton).  The yellow in the sky is mostly cadmium yellow pale and white, with some alizarin at the edges for the pinker tones.


4. I moved on to the white dress, which really doesn't have that much white in it at all! The shadow areas are a symphony of blues, purples, and greens, all remaining on the warm side relative to the cool lights. I had to squint a lot to make sure the folds didn't stand out too much. I was also careful not to make the shapes redundant or too similar to each other. I scumbled in the gravestone, keeping the paint thin so that the canvas texture added to the feeling of age and wear. The feet and legs were blocked in with darker values than the head and arms, since they are further away from the light source. I also covered the bottom of the painting with a thin patchwork of olive green and transparent brown to suggest the general value and color of the grass.


5. Moving forward, I refined the feet and legs. Because of my chosen color scheme, I was surprised at how much blue I ended up using in the skin (usually for skin tones I favor viridian over blue unless painting an African American model, or bright reflected lights).


6. Here is the finished piece. I used Rosemary mongoose hair brushes to attain the softness in the feathers, and painted the edges of the wings and background at the same time.


"Passage" - 36x24" - oil

“Yes, death. Death must be so beautiful. To lie in the soft brown earth, with the grasses waving above one's head, and listen to silence. To have no yesterday, and no to-morrow. To forget time, to forget life, to be at peace. You can help me. You can open for me the portals of death's house, for love is always with you, and love is stronger than death is.” - Oscar Wilde, The Canterville Ghost


Wednesday, March 26, 2014

Angels of Death - Progression Shots (Post 1 of 2)

For my artist friends and collectors alike - it's always fun to see how a painting develops from start to finish. I don't have a specific method that I use every time. Instead I rely on intuition and start a painting based on the subject matter, overall color temperature, and level of drawing difficulty. Regardless of the colors I choose to tone the canvas or to begin the painting, I always start with big shapes and the separation of light and shadow. Below I give you "Remembrance" from start to finish.

1. "Remembrance" was started with a light vine charcoal drawing on a white oil-primed linen panel (SourceTek). Knowing that I wanted the overall color temperature of the piece to warm and glowing (angelic, no less!), I used a thin wash of raw sienna (thinned with medium, see my materials page) for the background. I used a mix of ultramarine blue and transparent oxide brown for the underpainting of the hair, dress and skull, since I wanted some of those cool tones to show through in the final painting. From there I dove into the face and hands, separating the lights and shadows and using a general, opaque skin tone in the lights. The shadows, made up of mostly transparent oxide red (for the warm areas) and some viridian and ochre (for the cools), remained relatively transparent and thin.


2. The face was painted using the direct painting methods I employ when working alla prima. I wanted it to look fresh (as opposed to overworked), so I knew I would need to finish the face in one sitting. This required laying on thicker paint in the lights, being careful to make the relative values as accurate as possible.


3. Oh, the hair... what fun! I wanted it to feel radiant and full of movement. This required interlacing thick paint with thin, changing up brush strokes/directions, and employing warms next to cools for that extra "pop" of life. I also made sure to be selective about putting in single strands, only painting a few of them in order to convey the feeling of many. The rest of the hair was treated as a "mass," changing in value as it got closer or further away from the light source. Since the model's hair was auburn, I used a lot of alizarin crimson.


4. Once I was pretty satisfied with the face and hair, I moved outward. I made sure to work wet-in-wet around the edges after finishing a section of the painting, especially where the hair meets the background. If I had let the hair dry and then painted the background later, it would have looked a little too much like a cut-out. I wanted the model to transition softly and natural into the background with a variety of hard and soft edges. I wiped out the tops of the wings where the light is hitting them, adding to the feeling of softness and motion.


5. I began working on the hands, making sure the values related well with the values in the face and neck. I was also careful to keep "highlights" on the fingers to a minimum, since the hands are almost entirely in shadow and shouldn't stand out too much. The skull was blocked in using mixtures of white, ultramarine blue, alizarin, raw sienna, and radiant green.


6. The finished painting. The background was finished off with more raw sienna and viridian; I also painted the background at the edge of the skull (the "glow") before putting in my definitive lights on the skull itself. None of my lightest lights are pure white, but instead, have a touch of lemon yellow mixed in with them.


"Remembrance" - 16x20" - oil on linen panel 


I'll have another post about "Passage" up soon!

Monday, March 17, 2014

Recent Painting Workshop - Photos & Video Clips

This past weekend I had my last major teaching gig for the season, leading a 2-day intensive portrait painting workshop at the Trinity Arts Guild in Bedford, TX. After this I will probably not be teaching again until the fall (thanks to Baby Bain arriving in May), and will instead be focusing exclusively on painting projects and commissions for the next few months.

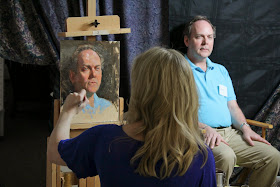
The workshop went well and I very much enjoyed the dozen or so attendees who came. We also had a couple of excellent models. Here are some photos from my morning demos, and a couple of short video clips that were taken. Enjoy!


Day 1 (model: Gord Shriver):


Day 2 (model: Audrey Fernandez):


I intend to do some more work on the above painting in my studio, since I couldn't quite finish it in three hours. I absolutely love doing demos, though - they are a great challenge and I learn a lot from them. It's always a good workout for your brain, trying to sort out the visual problems of a painting, while explaining what you're doing. :-) I hope the students enjoyed this workshop as much as I did!

Below: some brief video clips from the workshop.

On facial expression:


On soft edges and sensitivity in painting:


On determining focal point and color temperature:


Photography by George Dean (www.GeorgeDean.com).